
Step 3: Installing and Configuring External Secrets
The External Secrets Operator (ESO) is a Kubernetes operator, that integrates external secret management systems like OpenBao, AWS Secrets Manger, Google Secret Manager and many more with Kubernetes. It allows you to define Kubernetes secrets based on external sources, which are then automatically synchronized and updated in your cluster.
We will use ESO to fetch secrets from our OpenBao instance and provide secrets to tools as External DNS and cert-manager later on. To install ESO, we will again use Helm:
helm repo add external-secrets https://charts.external-secrets.io
helm install external-secrets external-secrets/external-secrets -n external-secrets --create-namespace --wait
As in the previous steps, we will get an output that the installation was successful.
Verify the Installation
kubectl get pods -n external-secretsTo verify that everything is running as expected, you can check the pods in the external-secrets namespace. Furthermore, you should see lots of new Custom Resource Definitions (CRDs) in your cluster, as ESO comes with many of them to support different use-cases. You can check this with the following command:
kubectl get crds | grep external-secretsIn the list, you should find things like secretstores.external-secrets.io or externalsecrets.external-secrets.io, which we will use later on.
After the installation, we can start configuring our first secret.
Create a secret containing your OpenBao Credentials
For our first example, we will create a new namespace called secrets-test and create a secret in it containing the token we created during the OpenBao setup. This secret will be used by ESO to authenticate against OpenBao. Afterward, will create an ExternalSecret resource to fetch the secret we created before. The connection between the objects is shown in the following diagram:
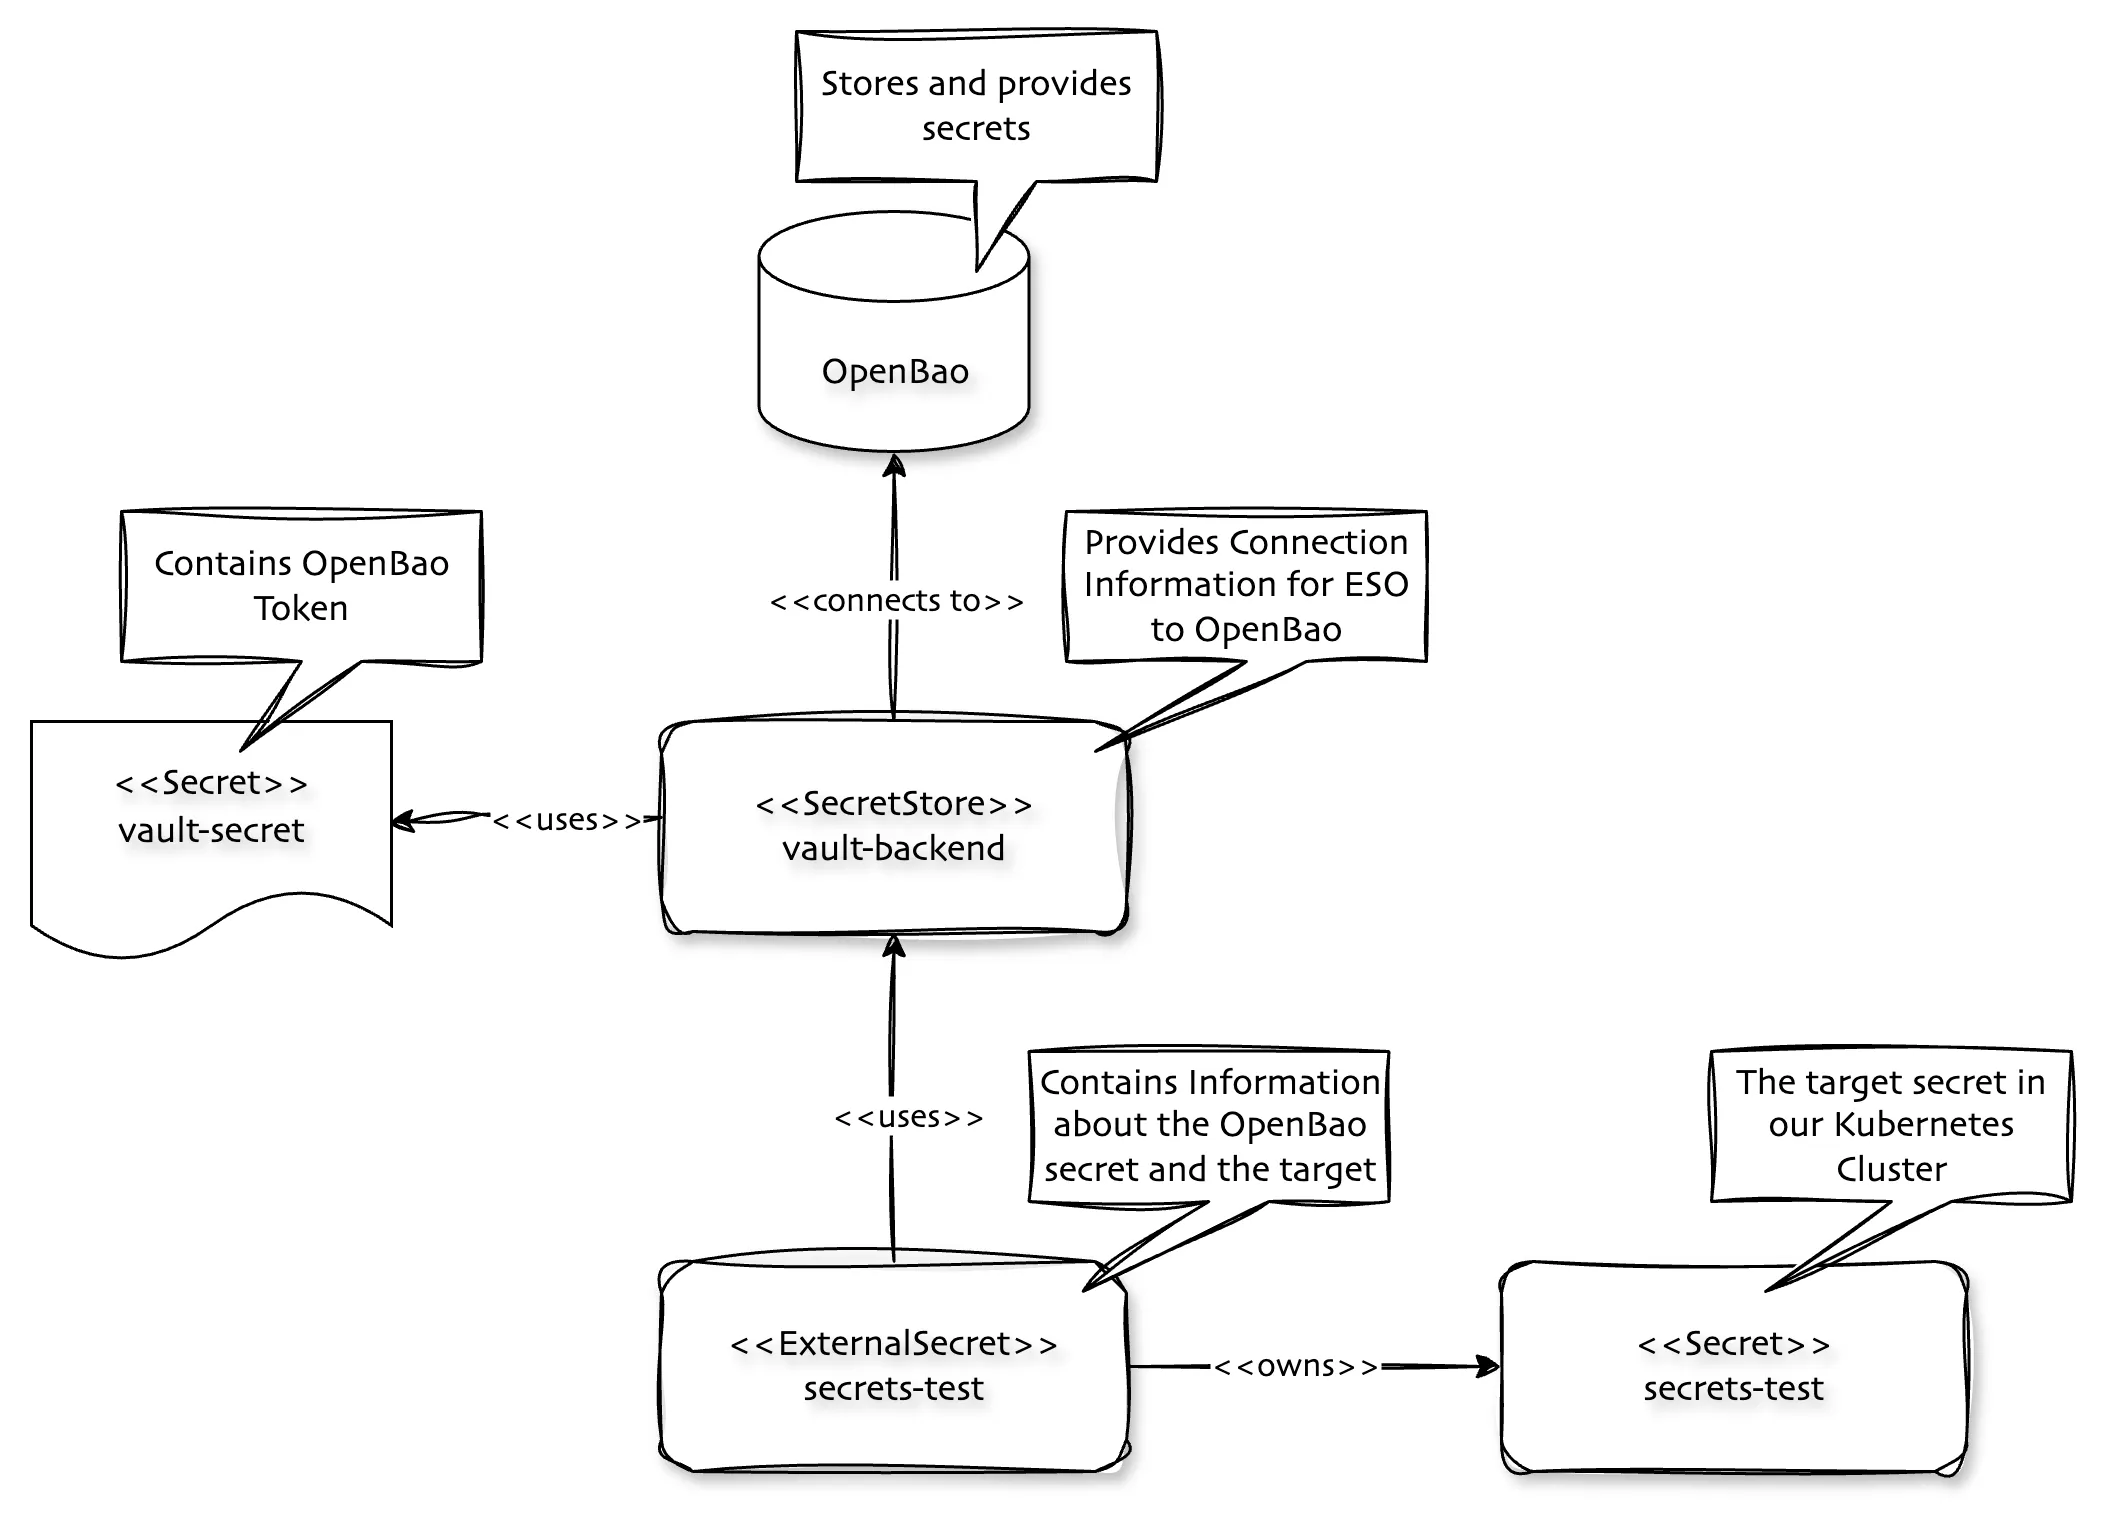
As a result, External Secrets will fetch the OpenBao Secret in a specified interval and will update a Kubernetes Secret that can be used by workloads.
To get started with our setup, let's create the namespace:
kubectl create namespace secrets-testIn the next step, we will create a secret containing our OpenBao token. Please replace <your-token> with the token you created before.
kubectl create secret generic -n secrets-test vault-secret --from-literal=token=<your-token>Note that this secret is created in the secrets-test namespace, as we will use it later on. In our lab, we will always use the objects in the same namespace, but it is also possible to use cluster-wide external-secrets resources.
In the next step, we will create a SecretStore resource to define our OpenBao instance as a backend for ESO.
Create a secret store for OpenBao
To create a secret store, we will create a new manifest file called secret-store.yaml with the following content:
apiVersion: external-secrets.io/v1
kind: SecretStore
metadata:
  name: vault-backend
spec:
  provider:
    vault:
      server: "http://openbao.openbao:8200"
      path: "secret"
      version: "v2"
      auth:
        tokenSecretRef:
          name: "vault-secret"
          key: "token"
This manifest defines a new SecretStore resource named vault-backend that connects to our OpenBao instance. It uses the vault-secret we created before to authenticate against OpenBao. The path field specifies the base path where our secrets are stored in OpenBao, which is secret in our case.
Now, we can apply this manifest to our cluster:
kubectl apply -n secrets-test -f secret-store.yamlAfter applying the manifest, you can verify that the SecretStore was created successfully using the following command:
kubectl get secretstore -n secrets-testIf everything went fine, you should see an output similar to this:
NAME            AGE   STATUS   CAPABILITIES   READY
vault-backend   4s    Valid    ReadWrite      True
What you see here is that our SecretStore is valid, was able to connect to OpenBao and is ready to be used. With this token, you would be able to read and write secrets in OpenBao, however, for this lab, we will only read secrets. The next step is to create an External Secret resource to fetch the secret we created before. Therefore, create a new manifest file called externalsecret-test.yaml with the following content:
apiVersion: external-secrets.io/v1
kind: ExternalSecret
metadata:
  name: example-secret
spec:
  refreshInterval: "15s"
  secretStoreRef:
    name: vault-backend
    kind: SecretStore
  target:
    name: my-first-secret
  data:
  - secretKey: my-key
    remoteRef:
      key: my-secret
      property: key
This manifest defines a new ExternalSecret resource named example-secret. It references the vault-backend SecretStore we created before and specifies that it should create a Kubernetes secret named my-first-secret. The data section defines that the key my-key in the Kubernetes secret should be populated with the value of the key key from the OpenBao secret my-secret. To apply this manifest to your cluster, use the following command:
kubectl apply -n secrets-test -f externalsecret-test.yamlAfter applying the manifest, you can verify that the ExternalSecret was created successfully using the following command:
kubectl get externalsecret -n secrets-testIf everything went fine, you should see an output similar to this:
NAME             STORETYPE     STORE           REFRESH INTERVAL   STATUS         READY
example-secret   SecretStore   vault-backend   15s                SecretSynced   True
Now, if you wait for some time (15 seconds in our case, as defined in the manifest), the secret should be created in your cluster. You can verify this using the following command:
kubectl get secrets -n secrets-testIf everything went fine, you should see an output similar to this:
NAME              TYPE     DATA   AGE
my-first-secret   Opaque   1      2m24s
vault-secret      Opaque   1      10m
To take a closer look at the content of the secret, you can use the following command:
kubectl get secret -n secrets-test my-first-secret -ojsonpath='{.data.my-key}' | base64 -dThe command above uses base64 -d to decode the base64 encoded value. On Linux, you might need to use base64 --decode instead. Now you should see the value of the secret, which is value in our case.
To validate that everything works as expected, you can change the value of the secret in OpenBao and see if it gets updated in your cluster.
Changing the secret
For this step, we will change the value of the secret my-secret in OpenBao to my-new-value. Therefore, please follow these steps:
- Open the OpenBao UI (ensure that your port-forwarding is still active):
http://localhost:8200and enter the root key (root). - Navigate to your secret ("Secret engines/secret/my-secret")
- Create a new version of your secret
- Change the value of the secret to "my-new-value" and click save
Validate the change on your kubernetes cluster with the same command as before (it might take 15 seconds to change).
You've successfully created your first external-secret which helps you fetching secrets from OpenBao and make it available to your Kubernetes workloads. In the next steps we will use this mechanism to provide the API key for our DNS provider to external-dns and cert-manager
Cleanup
To clean up the resources created during this step, you can delete the namespace secrets-test which will remove all resources in it:
kubectl delete namespace secrets-testAs we configured everything in the secrets-test namespace, this will remove all resources we created during this step. In the next step, we will set up External DNS to automate DNS management in our cluster.