
Create a simple Kubernetes Cluster
In this section, we’ll set up a Kubernetes cluster so that you can run workloads locally and learn the basics.
If you already have a Kubernetes Cluster installed, proceed to the next step
What is a Kubernetes Cluster?
A Kubernetes Cluster is a set of machines (nodes) running Kubernetes Components. Typically, a Kubernetes Cluster consists of a Control Plane and one or more Worker Nodes. The Control Plane manages the cluster, while Worker Nodes run your applications. In production, these are usually separate machines. With Minikube, everything runs on a single node.
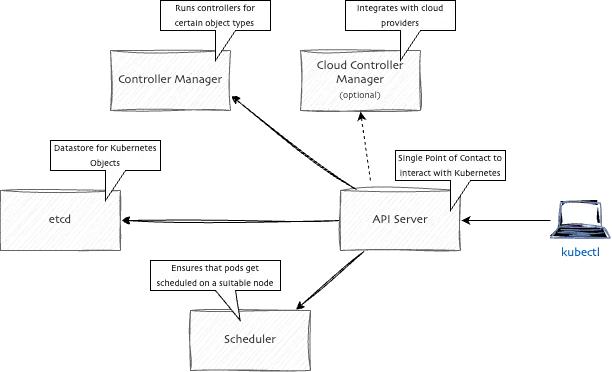
If you want to learn more about the Kubernetes Components, check out the Kubernetes Documentation.
Install a Kubernetes Cluster and kubectl
To interact with a Kubernetes Cluster, you need the kubectl command-line tool. It allows you to create, inspect, and manage Kubernetes resources. You can install kubectl by following the instructions on the Kubernetes Documentation.
You can verify that kubectl is installed by running the following command in your terminal:
kubectl version --clientFor this lab, you can use any Kubernetes cluster accessible via kubectl. If you don't have a Kubernetes Cluster installed, you can use one of the following options:
For this Lab, we will use Minikube, as it is available on all major platforms and easy to set up. To install Minikube, follow the instructions on the Minikube Installation Page. If you are able to interact with your Kubernetes Cluster using kubectl, you are ready to proceed.
If you are using Minikube on macOS and use Homebrew, you can install it with the following command:
# Install minikube (macOS with Homebrew)
brew install minikube
# Start cluster
minikube start
After installing Minikube and starting it (e.g. minikube start), you should see output similar to this:
🏄 Done! kubectl is now configured to use "minikube" cluster and "default" namespace by defaultIf you see this message, you have successfully installed Minikube and can now interact with your Kubernetes Cluster using kubectl.
Typically, you will use Minikube only for local development and testing. In production, you will often use managed Kubernetes clusters, such as Google Kubernetes Engine (GKE), Amazon Elastic Kubernetes Service (EKS), or Azure Kubernetes Service (AKS) as they will make managing your Kubernetes Cluster easier. For the things we will do in this Lab, it does not matter which Kubernetes Cluster you use, as long as it is accessible via kubectl.
Some useful tools
Over time, you will find many tools that make your life easier when working with Kubernetes. Here are a few optional tools that can make working with Kubernetes easier (not required for this lab):
- kubectx - A tool to switch between Kubernetes contexts easily, also contains
kubensto switch between namespaces - k9s - A terminal UI to interact with your Kubernetes Cluster
Throughout this lab, we will use kubectl, the Kubernetes command-line tool to interact with our cluster and create resources. The tools mentioned above are not required, but they can make your life easier when working with Kubernetes.